After preparing for your lift by powering on and pairing your camera, logging in your athletes, setting up your exercise selection, selecting your weight, and choosing your goals, you're ready to get lifting!
- In the bottom right-hand corner of the screen, there is an "Exercise Preset" button that will allow you to change your camera angles. To learn more about it, see our guide here - the icon will turn "green" when the tracking method (either the bar, plates, or the head) is within the field of view, and "red" when it is not found.

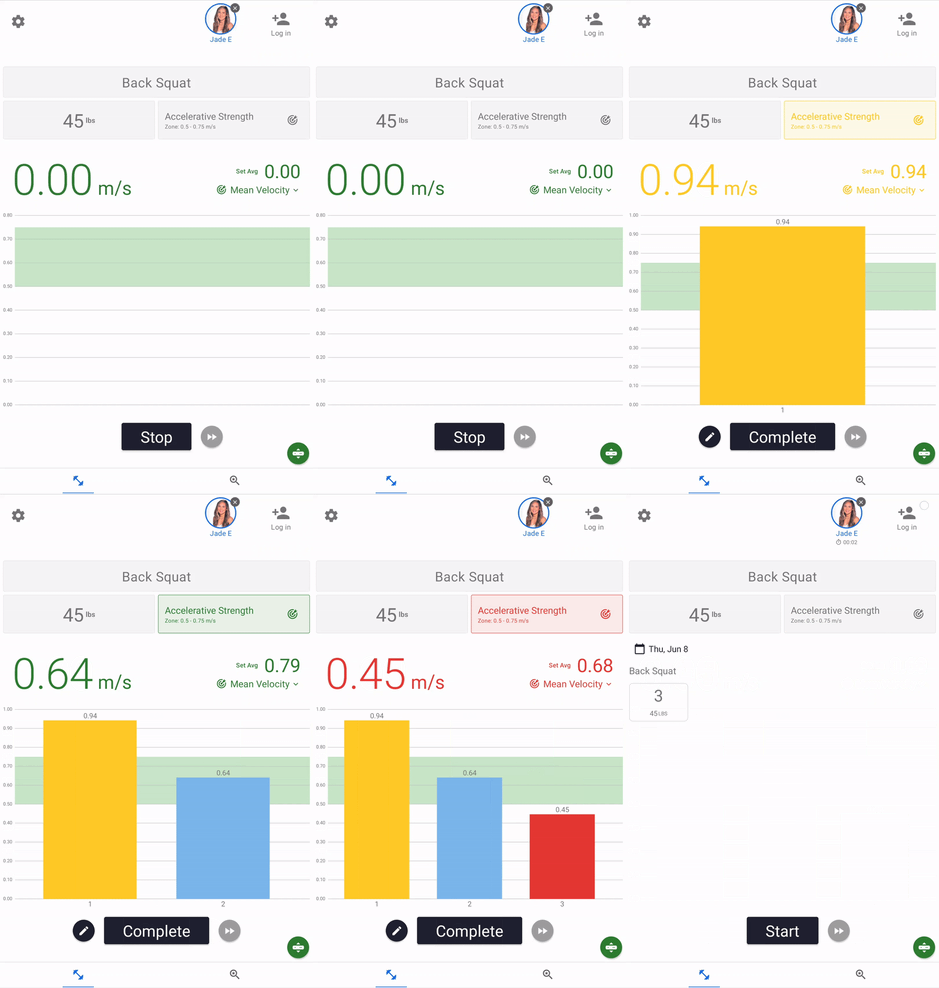
- To begin your lift, select the “Start” button at the bottom of the page. This will take you into a lifting screen, where you'll see an empty chart as well as two numbers that say 0.00 m/s.
- This will change as reps populate - the number on the left hand side of the screen represents the most recent rep, and the number on the right hand side represents the set average.
- Directly underneath the set average is where you'll see the displayed metric - click this button to change what you're looking at in real time! The metric will default to Mean Velocity for strength-based movements, and Peak Velocity for explosive movements. For more on our metrics, see our guide here.
- As you lift, reps will pop up! There are a few colors the reps will display as:
- Blue by default
- When a goal is applied to the set, either blue, yellow, or red based on the goal
- When a unilateral lower body exercise is selected, either blue or black depending on the starting leg and the movement pattern
- In this example, the "Accelerative Strength" Goal has been selected, with a zone of 0.5 to 0.75 m/s. When a "Goal" is applied to the set, there will be a green range displayed when the goal matches the displayed metric. If a different metric is being displayed live, there will be no red line, but the reps will still display the color based off of the applied goal. The metric to which the goal applies will have a target icon next to it. To learn more about our "Goals" feature, take a look at our article here.
- Once you have completed your lift, simply press "Complete" to save the set!
- To edit a set, tap the square-shaped set tile icon on the main menu screen.
- To apply "Auto Mode", select the fast forward icon next to the Start button. If it's enabled, it will highlight in red, and if it's disabled, it will highlight in grey. To adjust the timer that Auto Mode is based on, go into Settings > Preferences. To learn more about the Perch app settings, see our guide here.
- At Perch, we take pride in our system working well, but problems will happen from time to time.
- If there's an error within the set, you can click on the pencil icon next to the Complete button to report it before saving the set. Click a rep to delete it from the rep count and the set average - it will highlight in black, as will the Ghost Rep box. To add it back in, tap the rep again.
- To report an error after a set has been saved, tap the individual set tile on the main menu screen.
- Selecting 'Missed Reps', 'Values Seem Wrong', or 'Other' will prompt our support team to investigate the set and see what could be going wrong! This will help us to help you by either instructing you how to adjust things to make the data better, or by running it through our machine learning algorithms, which help with more frequent tracking software updates.
As always, if you have any questions, please contact your Perch representative or reach out to our support team via email at support@perch.fit
