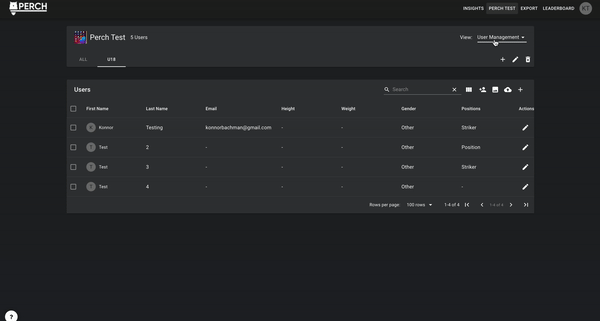
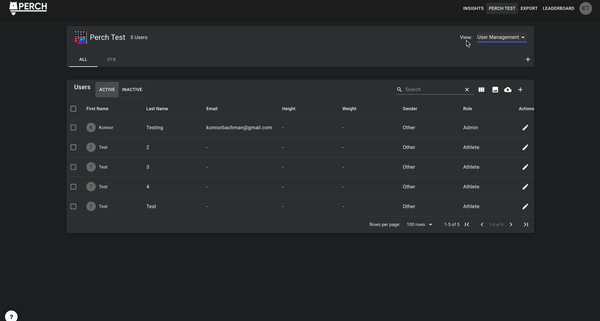
Select your organization name in the top right-hand corner of the web app. This will take you to your Organization Page, where you can edit your teams, adjust your roster, set lifting groups, set favorite exercises, and set/adjust 1 rep maxes.
Teams
You can set up your Teams along the top of the page. Teams can be used to filter when doing things like exporting, analyzing Insights, or using the Leaderboard.
To set up a team, select the + button under the View dropdown that defaults to User Management. You can name the team whatever you'd like - this functionality is typically used for different groups of athletes (Bigs/Combos/Skills on a football team), different positions (guard/forward/center on a basketball team), or different sports (baseball/softball/volleyball within the olympic department of a university or high school).
User Management
This is where your roster management will take place. You can create and edit users, set roles, deactivate or reactivate users, create/edit positions, add emails, and add information like gender, height, and weight. To learn more about this functionality, read through this article.
Favorite Exercises
Adding favorite exercises will help you stay organized, allow you to put an emphasis on exercises you perform more frequently or want to highlight. These favorites will appear as their own category in the tablet app as well so that athletes and coaches can easily navigate through them on the floor.
- In the Views dropdown, select Favorite Exercises
- In the menu that opens, you will see "All Exercises" on the left and "Favorite Exercises" on the right.
- To add to your favorites, you can search through the left menu, and simply click the star. The exercise will be favorited and immediately added to your favorite menu.
- To undo this, simply click the star again and the exercise will be unfavorited.
1RMs
Saving an athlete's 1 RM in the Perch web app has several key benefits. Most notably, when you export data, you can see the weight the athlete lifted as a % of that athlete's 1 RM. This is helpful in building force velocity profiles and filtering the data in other ways (e.g. filtering out warm up sets, etc).
To edit a single athlete's 1 RM:
- Locate the "Views" drop down menu and select "1 RMs." This will adjust the view so that the columns display various exercises associated with all of your users.
- Click the pencil icon next to each athlete to edit their 1 RMs. You can type in the weight and select between lbs and kgs.
- Click the check mark to save the changes.
- You can filter what lifts you are viewing by clicking the "Show Columns" icon in the top right of the "Users" section. You can select all the exercises available to you, deselect all of the exercises, or only your favorite exercises.
Importing and Exporting 1 RMs for multiple athletes:
- In the 1RMs section, select the Cloud button with a down arrow, and select the "Export as CSV" option. This will export a CSV template.
- Open the CSV and add the 1RMs for your users. Please note, the formatting must remain the same - don't delete any of the existing IDs on the page. Save the document.
- Back in the Web App, select the Cloud icon with the up arrow. Click on the Choose File option and select the file saved in step 2 above. Click Save, and find the exercises that have 1RMs entered in the document selected - they should now have numbers associated with the appropriate athletes.

Groups
Groups are conceptually similar to teams. They are just another way of grouping and organizing your athletes. You can create groups under your overall organization. Once groups have been created, they can be used to create lifting groups to quickly log multiple athletes in at once on the tablet, filter an export based on a specific group, or filter a leaderboard based on a specific group. To create Groups:
- In the Views menu, select the Groups option.
- Click the (+) icon to create a new group.
- Select the "Add Users" button to add users to a group.
- Note: groups work hierarchically. If you create a group under the "All" team, you can add any members of your organization to a group. If you create a group within a team, The only users available must be part of the Team. We recommend adding users to a team before creating groups.
There may be instances in which you want to upgrade groups to a team:
- While viewing a group, click the pencil icon to edit the group.
- Change the group from a group to a team.