The Perch Web App enables you to manage all of your devices from a singular place.
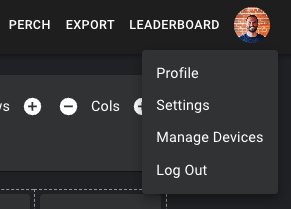
To access this page, select your profile image in the top right hand side of the web app and scroll down to “Manage Devices.”
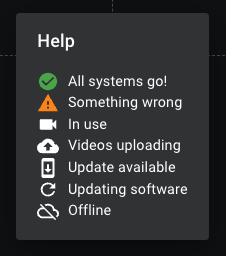
The control center will show you a number of tiles, each representing a camera system in your weight room. There may a symbol or two below your device's name. Click the "Help" button (question mark at top of page) for a key regarding what these symbols mean. They can mean "In Use," "Updating software," "Something's Wrong," etc. It's a quick look at what's going on with your Perch cameras.
Additionally, the Control Center serves several other key purposes:
Transfer Your Exercise Presets From One Camera to Others.
Update All of Your Devices Remotely
Virtually Position Your Devices
Find Out More Information About Your Devices
NOTE: You will first need to sign into each tablet and connect the tablet to the camera before any devices show up in your control center. This is how the devices get assigned to your account.
Rename Your Devices
Depending on how many devices you have, this feature will vary in its usefulness to you.
Your Perch device comes with a factory preset name, for instance - "Perch_045." However, you may want to rename your device. Examples would be "OrganizationName_01, OrganizationName_02...." Renaming can be useful for several reasons:
- It is easier remember which device is which for purposes of troubleshooting or support cases.
- It will help ensure that the correct tablet is paired with the correct camera. For instance if i you label your tablets with numbers on the back, at a glance, you can ensure that the right tablet is at the right rack, preventing any Bluetooth issues.
To rename your devices:
- Click the square representing the device in the control center
- In the window that pops up, click rename.
- Rename it and click save.
NOTE: Your camera needs to be on and connected to wifi for this to take effect. The camera will reboot when you change the name and come back online with the new name.
Transfer Your Exercise Presets From One Camera to Others
We previously discussed how to set up Exercise Presets on a single camera. This process can take a little time and doesn't scale well to an entire weight room of devices. This is why we enable you to transfer presets from one device to another using the control center.
To transfer presets:
- Click "Transfer Presets" in the top left of the screen
- The menu will change to reflect transferring presets FROM ________ TO ________.
- Select the camera you set your presets on first - this will fill the FROM box in step 2 above, and will be represented by a copy icon.
- Select the cameras you want the presets transferred to. You can select multiple here - each box will have a check mark in it. These will fill the TO box.
- Click the Transfer button and ensure you receive the success message.
Just like that, you have customized the camera positions of every weight rack in your weight room.
Update All of Your Devices Remotely
We send out software updates to cameras periodically. When this happens you will have to manually install these updates (so you don't get hit with updates in the middle of your lift).
You will receive a notification on the tablet that an update is ready to be installed or you will see a symbol on each camera tile in the control center. You can install updates from the tablet by following the on screen prompts. However, if you have a large number of weight racks, it will save you time by updating all of your devices from the control center. Just click the "Update Devices" button in the top left of the screen.
****NOTE: Your camera needs to be on and connected to wifi for them to update. Updates can take a bit of time depending on a handful of factors, so only update when you have time.
Virtually Position Your Devices
Similarly to renaming your devices, this feature will vary in usefulness. Within the control center each device is represented by a square that you can drag within a grid of which you control the size. To paint a picture on this feature's usefulness, let's walk through a hypothetical:
Let's say you have 20 weight racks in your weight room. You have to 10 weight racks on each side with a lane running down the middle. You decide to name your devices "OrganizationName_01, OrganizationName_02......OrganizationName_20. For simplicity, you put the odd numbered cameras on one side and even on the other, progressing chronologically as you move down the racks.
You can then position the devices virtually in the same way they are positioned physically. Having a virtual representation will make making updates, troubleshooting issues, and transferring presets a seamless process.
Find Out More Information About Your Device
If you click on each device within the control center you can open up a dialog box that will provide you with more information on that device:
- Device ID
- Software Version the camera is running
- The Wifi Network
- The IP Address
- And the MAC address.
All of these details will be useful to have when troubleshooting issues with support or communicating with your IT department.
Gently Powering off Your Device
Devices that are powered down from the app as opposed to ones that are powered down via the battery itself are more likely to ask longer. For this reason, we added functionality into our app. Learn more about the process, see our guide here.