The Perch App is simple yet comprehensive. This is not an exhaustive feature list, but a general overview of the major components of the Perch App. You can check your tablet's compatibility here.
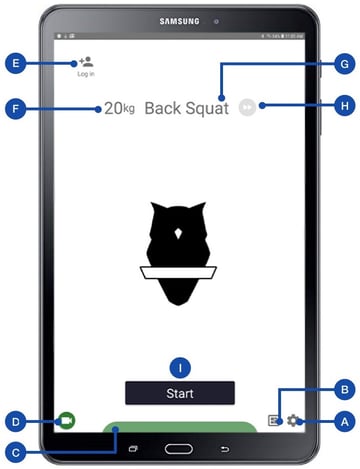
After opening the App and logging in, your Perch home screen will have 9 major buttons:
- Settings (A): This is where you will find your Admin Account, Workout Options, and Connectivity Options.
- Exercise Presets (B): Where you will go to set the camera position for any exercise. We walk you trough how to do this in more detail in a separate article here.
- Bar Visibility Indicator (C): Indicates whether or not the camera is seeing the barbell. Red indicates barbell is not in the field of view of the camera. Green means good to go for gains!
- Connectivity (D): Where you will go to see if the camera is connected to WiFi and Bluetooth. For more details you can refer to our connectivity guide.
- Athlete Login (E): What you or your athletes will tap to log into the app and begin lifting.
- Weight Selection (F): Where you or your athletes will enter the weight they are lifting.
- Exercise Selection (G): Where you or your athlete will select the exercise they are performing.
- Auto-Mode (H): This is what you select to automatically rotate between athletes. Automode uses a timing threshold between reps to determine when a set automatically finishes and the next user is logged in. More information on Auto-Mode can be found on our Additional lift settings page.
- Start Button (I): This is what you or your athlete selects to begin their set. This button is not present during auto-mode as sets automatically start.